Audio amplification on a Mac has come a long way, giving users powerful tools for everything from music production to boosting system sounds for clearer dialogue or presentations. As someone who enjoys tinkering with Macs for both music and daily listening, I’ve found that knowing even the basics of audio amplification can be a real game changer. Whether you want to make your music sound richer, ensure your conference calls are crystal clear, or just enjoy movies with more punch, understanding how audio amplification works on a Mac is really useful.
What Does Audio Amplification Mean on a Mac?
Audio amplification is the process of boosting audio signals so that sounds come out louder and clearer through speakers or headphones. On a Mac, this could mean increasing the output volume with software, using built-in features, or connecting to external amplifiers and interfaces. For regular users, it often starts as simple as making sure your movies, music, or conference calls aren’t held back by low or distorted sound. As you begin to tweak these options, you learn how much of a difference even minor changes can make to your daily audio experience.
Common Ways to Amplify Audio on a Mac
When I first started working with amplified sound on my Mac, I explored several different paths. Some options require no extra hardware, relying entirely on the Mac’s internal capabilities, while others involve connecting external devices for more control and better sound quality. Here’s an overview of what you can check out:
- Using the Built-in Sound System: The simplest way to boost sound is through macOS’s own volume controls and equalizer settings. Apps like Music and Podcasts have their own volume sliders and sound boosting tools. You can also tweak audio output settings in System Settings for quick improvements.
- Software-based Amplifiers: Third-party apps can take audio further by offering graphic equalizers, virtual volume boosts, and sound shaping tools. Tools like Boom 3D, eqMac, and SoundSource are popular because they’re easy to install and offer a lot of control. I’ve used Boom 3D to create a surround sound effect and boost the overall loudness for movies when my built-in speakers needed some extra help. Free options like eqMac are great for experimenting with sound profiles to track down what works best for your listening environment.
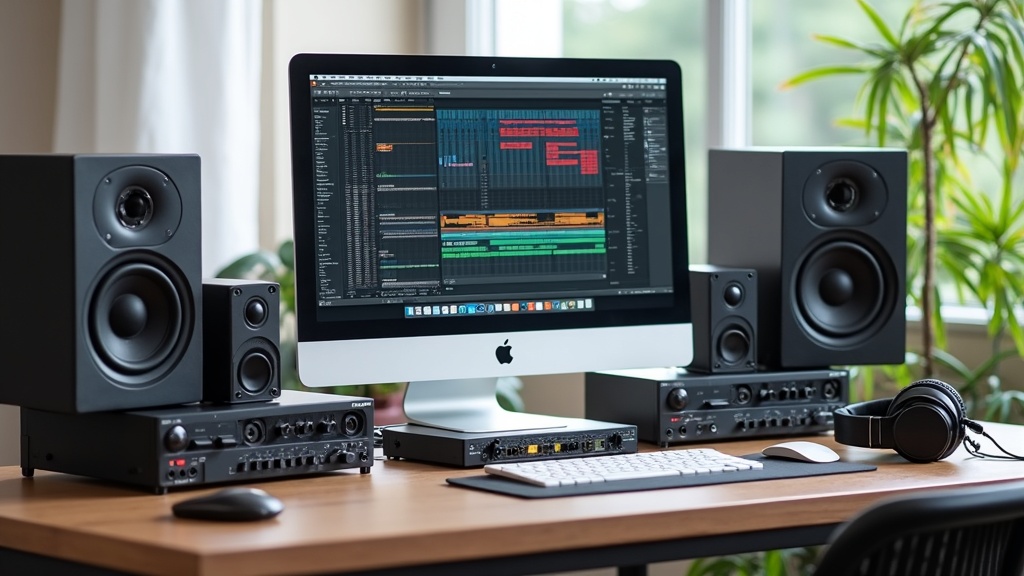
- External Audio Devices: For those who need more than software, adding an external audio interface or a dedicated headphone amplifier can take sound to another level. Devices connect via USB or Thunderbolt and usually offer higher quality DACs (digital to analog converters), which can make your music and gaming audio sound much more immersive. I use an audio interface when I’m recording instruments or listening to uncompressed high quality tracks. Some USB DACs also have their own software for adjusting gain and EQ, giving you even more choices to shape your sound.
Types of Audio Amplification for Mac Users
Not all amplification is the same, and choosing the right kind depends on your needs. Here’s a quick rundown of the main types you’ll bump into on a Mac:
- Integrated Amplifiers: These are part of your Mac’s default hardware. The built-in sound system, including the headphone jack and internal speakers, uses a small amplifier to deliver sound. This setup is fine for casual listening but can fall short in noisy environments or with high impedance headphones.
- Digital Audio Interfaces: These plug in between your Mac and your speakers or headphones. They’re common among music producers and podcasters. Using one brings more power and clearer sound, especially if you need to manage microphones, instruments, or studio monitors. Some beginner friendly options include Focusrite Scarlett and PreSonus AudioBox. You’ll appreciate these especially if you want to get into multitrack recording or want to add some variety to your sound sources.
- USB DACs and Headphone Amps: These devices bypass your Mac’s built-in audio circuits for a cleaner, louder sound. Many audiophiles use USB DACs and amps like those from iFi or AudioQuest DragonFly to get the most out of high end headphones or speakers. Plugins are simple; just connect to your Mac, choose the new output device, and you’re set. USB DACs are also portable, so you can take them on the go for boosted audio with your laptop.
Understanding Key Audio Features in macOS
macOS is packed with sound features, and knowing how they interact with amplification helps get the most out of your audio:
- Volume Limiters: macOS has built-in controls to prevent accidental hearing damage. Pushing past these using third-party apps can be tempting, but always consider your hearing and equipment limits before cranking it too high.
- Audio MIDI Setup: This tool is in macOS Utilities. I use it to manage sample rates, set up aggregate devices, and control volume for multiple outputs. It’s really handy if you have an external audio interface or multiple speakers. With just a few clicks, you can route audio exactly where you want and tweak levels so everything sounds clear.
- Equalizer Settings: Apps like Music and third-party boosters give you a graphic equalizer. Adjusting these lets you emphasize bass, cut harsh highs, or make voices clearer. Making a small tweak here can have a big impact on how things sound, especially if you’re working with basic speakers. Experiment with different presets or create your own custom curves to shape the sound to your liking.
Choosing the Right Amplification Gear for Beginners
When I first got into Mac audio, the variety of gear and software was a bit overwhelming. Here’s what I wish I’d known from the start:
- Identify Your Real Needs: Are you mostly watching movies, joining Zoom calls, or creating music? For casual use, a software amplifier usually does the trick. If you mainly listen on lightweight headphones or speakers, you might not need anything else.
- Ease of Use: Stick with plugandplay solutions first. Software like eqMac installs quickly and starts improving sound right away. If you’re adding hardware, find models with Mac support and straightforward connection instructions. Look for products labeled ‘Mac compatible’ to avoid headaches.
- Compatibility: Always check if a device or app supports your current macOS version before investing. The best place to check is the manufacturer’s or the app developer’s official website. Updates can mix things up, so check forums for reports on how well new macOS versions play with your gear.
Pitfalls and Myths Around Mac Audio Amplification
There are a lot of assumptions floating around about getting the best sound from a Mac. Here are some rumors I’ve seen and the truth behind them:
- “Volume Booster Apps Always Improve Quality”: Not true. Pushing amplification through software alone can boost loudness but might introduce distortion or even damage speakers if pushed hard, especially at very high settings.
- “Expensive Gear is Always Better”: While highend DACs and amps can make a difference, most users notice big improvements with small adjustments or budget friendly interfaces. Consider your actual listening environment; you may not need the priciest option.
- “External Hardware is Required for Great Sound”: Many Macs provide clear and punchy audio just with internal settings or basic software tweaks. For many people, external hardware is optional rather than required, especially for daily tasks or casual listening.
Key Audio Terms for Mac Users
Getting comfortable with basic terms makes troubleshooting and upgrading your setup much smoother:
- Gain: The amount an audio signal is increased before reaching your outputs. Adjusting gain affects loudness but can also add noise if cranked up too high.
- Impedance: Shows how much resistance your headphones or speakers present to the amplifier. Higher impedance headphones might need a dedicated amp to reach a good volume without distortion. Compare the impedance rating on your headphones to the recommendations for your amp or interface.
- Distortion: Any unwanted change to the original audio signal, often caused by over amplification or poor quality gear. Keeping your volume levels sensible helps avoid this.
- Signal to Noise Ratio: A measure of how clean an audio signal is compared to background noise. Higher numbers mean clearer, more detailed sound. Look for this stat in device specs and choose gear with higher ratings for cleaner output.
Guide to Getting Started with Mac Audio Amplification
Getting set up can be pretty straightforward. Here are steps I follow when helping friends improve their Mac audio:
- Update macOS: Make sure your system is up to date for the latest audio optimizations and bug fixes.
- Review Audio Settings: Start with System Settings and adjust your output and balance controls for the current headphones or speakers. Double-check sound output selections so you’re not accidentally playing through a less capable speaker.
- Try Built-in Solutions First: Tools like Audio MIDI Setup and the built-in Music app offer equalizers and output tweaks that can improve sound for little to no cost. Take a moment to sample the presets and see if your favorite genres benefit from a different EQ curve.
- Install Software Amplifiers: Apps like eqMac, Boom 3D, or SoundSource let you customize profiles for listening, communication, or gaming. Most of these apps offer free trials, so you can test features before paying.
- Connect External Devices (Optional): If you want even more power, plug in a USB DAC, audio interface, or headphone amp. Remember to select your new output device in System Settings. Some interfaces come bundled with software packs, so take advantage of extra tools included with your device.
Everyday Uses for Amplified Mac Audio
Audio amplification isn’t just for audiophiles. If you work from home, clearer voices during calls are really important. For students, boosting volume can help in noisy environments or for watching lectures. Music lovers unlock richer sounds for every genre, and gamers enjoy more immersive effects. Even people watching TV shows on their Mac at a distance benefit from loud and balanced output that makes dialogue easier to follow.
- Online Calls: Amplified audio helps me catch every word during meetings and keeps me from asking people to repeat themselves. Even slight enhancements to clarity make a difference over a long workday.
- Music Playback: Custom profiles and hardware devices add more detail to my favorite albums, especially with high resolution audio files. Certain styles like classical and jazz can sparkle with a few subtle adjustments.
- Video Streaming: Built-in volume limiters can be adjusted with the right software, giving movies a boost without losing clarity. Action scenes and quiet dialogue become more balanced, and you won’t miss the small details.
- Gaming: Using a headset amp or quality DAC sharpens sound cues, which can really help in fast paced games where every detail counts. Spatial effects become more pronounced, letting you get a leg up in competitive titles.
Frequently Asked Questions
People usually have a few questions when starting out with Mac audio amplification. Here are the ones that come up most:
Question: Can I damage my speakers by using sound boosting apps?
Answer: Constantly running software beyond the recommended limits can strain tiny built-in speakers or low quality headphones. Always increase volume in small steps and use apps from trusted developers. Listen for distortion or rattling as a sign to dial it back.
Question: Are external amplifiers necessary for all users?
Answer: For most users, the built-in amp and software do a good job. If you have high impedance headphones or produce music, external devices help, but they aren’t required for everyday needs. Try software tweaks first before investing in hardware.
Question: What’s the best free way to boost audio on a Mac?
Answer: Try using EQ adjustments in the Music app or install free tools like eqMac. Just avoid boosting past your speaker’s safe maximum to keep sound clean. Testing different sound profiles can give a bigger improvement than just turning up the volume.
Feeling More Confident With Your Mac Audio?
Understanding your options for audio amplification helps you get the best sound experience for your needs. I’ve found that even a few tweaks can make listening, working, and relaxing with your Mac a lot more fun. As you try out new tools and hardware, you’ll stumble upon the combo that fits your preference and budget best. So start testing, make a few changes, and enjoy a boost in every Mac audio session!